ImageVault 5 setup
When an ImageVault site is installed it needs to be configured. When you navigate to an ImageVault site after it has been installed, you will be redirected to the setup page. This page is normally not accessible by non-admins but after initial installation it will be accessible to all until setup is completed.
Note
If you get an access denied error (401) before the setup is completed, you can temporarily modify the application settings iv:setupEnabledForNonAdmins to allow an anonymous users to access to the setup page.
Wizard
The setup is a wizard based guide that lets you configure your ImageVault instance. It will modify the ImageVault database and the web.config file in the web root so be sure to not overwrite it after configuration is completed or configuration will be reset.
Progress
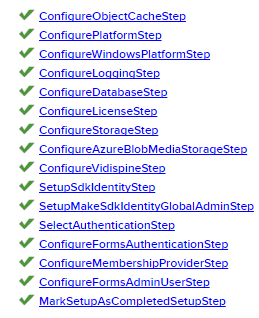
The progress list is a list of all steps that has been performed in the setup. You can revisit a step by clicking on it's link.
Actions

When a step is shown, a set of actions are available.
- Ok submits any changes and moves to the next step.
- Skip ignores any changes and moves to the next step.
- Restart setup restarts the setup from the beginning.
License agreement
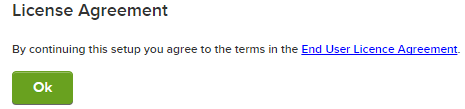
This steps links to the End User License Agreement (EULA) and you need to agree to the terms before using the product. Click Ok to accept the EULA.
Configure Object Cache
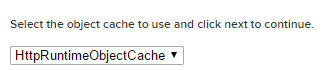
The object cache is used to cache data for the application. You can select one of the following types.
- HttpRuntimeObjectCache - Caches information in the web process. Fast and easy cache but not suitable for scaling (multiple Azure instances or load balanced IIS instances).
- RedisObjectCache - Caches information in a Redis instance. This is suitable if you use multiple Azure instances or running a load balanced setup. Requires a Redis instance.
Configure Redis Object Cache
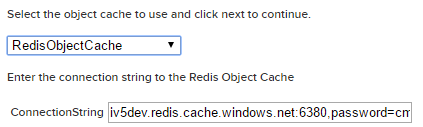
If Redis cache was selected, you need to fill in the connection string for the Redis instance.
Configure Platform
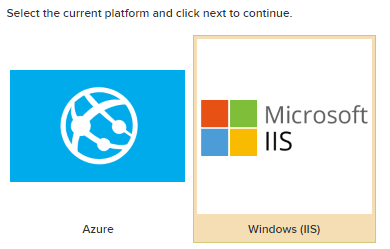
This step allows you to configure on what platform you are running the installation. Possible choices are:
- Azure Platform - Will store uploaded/zip files in an Azure Blob Storage.
- Windows Platform - Will store uploaded/zip files in the file system.
Configure Azure Platform

If the Azure platform was selected, you need to enter the connection string to the Azure Storage Account that ImageVault should use. The setup will create containers that it needs so each ImageVault installation needs to have separate Azure Storage Accounts. If you run multiple instances using the same data you can use the same storage account for all installations.
Configure Windows Platform
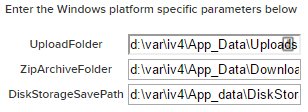
If the Windows platform was selected, you need to enter the folders for storing uploaded/zip/media files. The folders will be created if they do not exist.
Note
If you upgrade from an existing installation you probably have these folders with files in them. You can either move the contents to the new location or point out the existing folders.
Configure Database
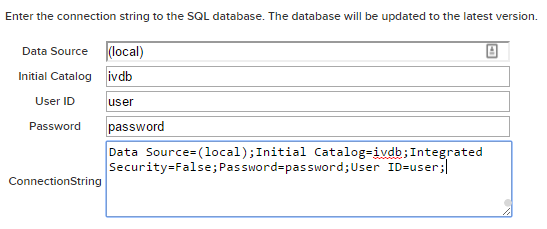
Regardless of platform, ImageVault needs a SQL database to operate. Enter the connection string to the database server. This step will also update the database to the latest version. You can either fill in the individual fields or edit the connection string directly.
Note
Database update will also be performed (if needed) when the ImageVault application starts.
Read more about connection string syntax on SqlConnection.ConnectionString documentation.
Configure License

To be able to use ImageVault you need to require a software license. These can be retrieved from Meriworks partner portal or from EPiServer License Center. A free time limited demo license can be downloaded for evaluation purposes. You can continue without a license but some functions will be limited.
When you have retrieved a license file, place it in the webroot folder and reload the page. If license is accepted, information about the license will be shown.
Configure Media Storages
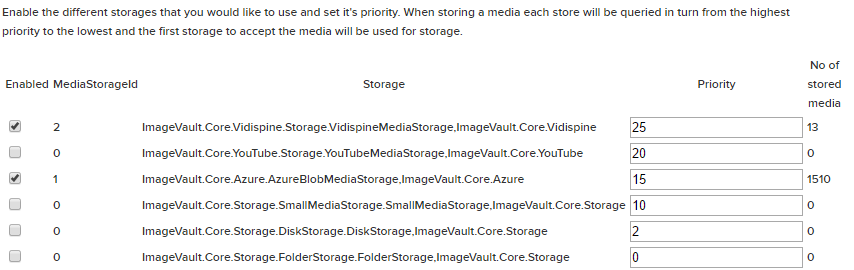
ImageVault can store media in different storages. In this step you can enable different storages by checking the storages you would like to use. The priority can also be changed. Priority is used when a media storage should be assigned for a specific media. Some storages can only store media that fulfills some criteria (like, Vidispine only stores videos and small media storage only stores media files that are less than 1Mb in size). Each storage will be queried in priority order. High priority has precedence over low priority storages.
As a recommendation, for Windows we recommend to activate SmallMediaStorage and DiskStorage and for Azure we recommend activating AzureBlobStorage.
Configure Azure Blob Storage

If Azure Blob Storage is enabled, you need to enter the connection string to the Azure Storage Account that should be used to store the media files. It will use the same Azure Storage account as was entered in the Configure Azure Platform step (a separate container will be created for the Azure Blob Storage).
Configure Vidispine
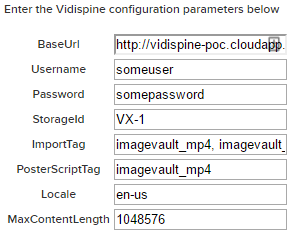
If Vidispine Storage is enabled, you need to enter the configuration for your Vidispine instance.
Create Sdk Identity
When connecting to ImageVault using the API you need to supply a client identity. This step will create the iv4sdk client identity that can be used to connect to ImageVault. Enter a password for the iv4sdk identity. This password is used when configuring any client that should be able to connect to ImageVault.
Note
Remember to write this password down since you need it to configure any connectors
Configure Authentication
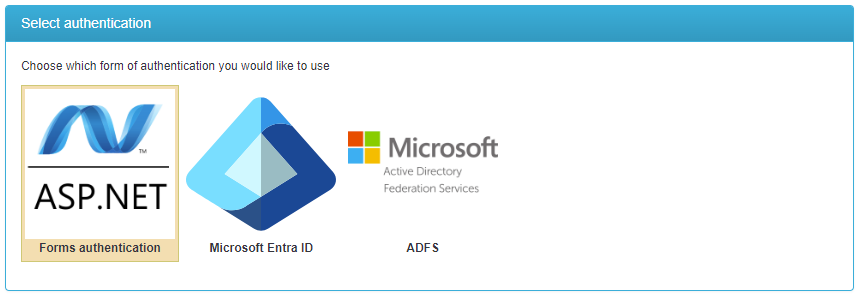
Here you can select the authentication to use for ImageVault. If you need any other form of authentication, you can configure this manually.
Forms authentication
Uses a standard .net membership/role provider and uses a cookie to maintain user sessions. Select this if you want to have a separate user catalog for your ImageVault users.
Configure forms authentication

When forms authentication is selected you need to configure what membership/role provider you would like to use.
Configure membership provider

If you selected a membership provider you need to select a connection string to use to store the membership tables. You can use the "Database" connection string (which is the ImageVault database connection string). It will list all connectionStrings in web.config so, please add any custom configuration strings there.
Create admin user
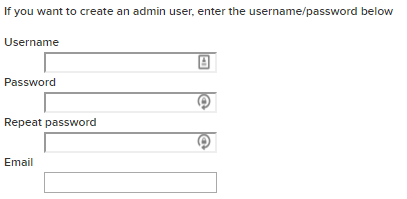
Here you can create an administrator account for the ImageVault installation. Enter the details to create a user that is an ImageVault administrator (assigned to the Administrator GlobalRole).
Microsoft Entra ID
You can use an existing Microsoft Entra ID to authenticate users. You need to prepare the Microsoft Entra ID and add a application as described in the Microsoft Entra ID authentication documentation.
Configure Microsoft Entra ID
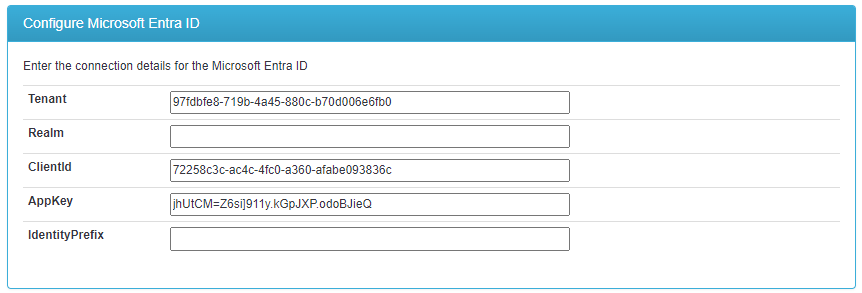
Enter the values for the different connection fields as described in the Microsoft Entra ID Authentication documentation.
Configure Microsoft Entra ID administrator
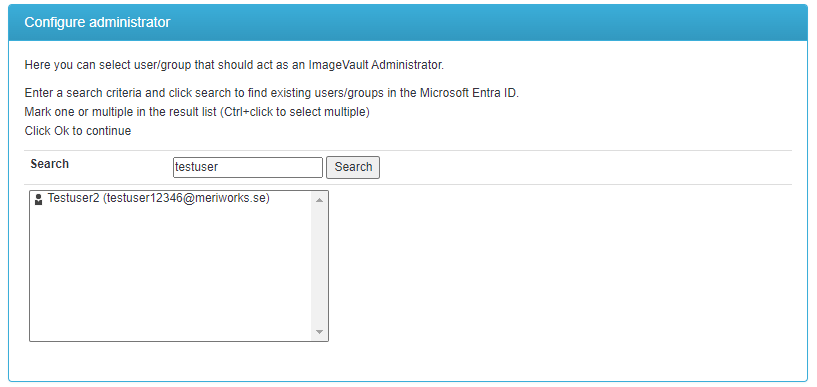
Here you can search and select one or more users/groups that should be administrators in ImageVault. You can assign this role further in the ImageVault admin dialog when setup is completed. This step is just to allow admin access from the beginning.
ADFS
Use federated authentication using an Active Directory Federation Service. You need to prepare the ADFS and add a Relaying Party trust. Requires that the ImageVault site is accessible by HTTPS, only.
Configure ADFS

Here you enter the Federated metadata URL pointing to the ADFS server and the realm that you configured the relaying party trust with.
Configure ImageVault Administrator

Since the ADFS authentication doesn't support lookup, you need to manually enter the user principal name or a role claim that should be assigned as an administrator. The display name is optional as a more describing name for the identity.
Completed
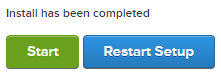
When completed, login and press Start to begin using your ImageVault.
Re-running setup
You can re-run the setup by navigating to /setup/?configure=1 at any time.
You need to be a user with the Administrator GlobalRole to be able to access the setup page.