Installing ImageVault Connect for Episerver (v11)
This instruction presumes that you have an existing ImageVault instance, either in the same place as your Episerver solution or hosted some where else, and will only cover the steps to install the ImageVault Connector in your Episerver solution.
- Step 1 - Adding NuGet packages
- Step 2 - Configuring the ImageVault client
- Step 3 - Compiling the solution
- Step 4 - Finishing touches
Step 1 - Adding NuGet packages
To be able to write code using the ImageVault properties for Episerver CMS you need to add NuGet packages to your Visual Studio project. For ImageVault a number of packages exist on the official nuget.org feed.
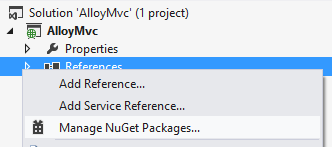
Open your solution in Visual studio and select Manage NuGet Packages from the menu.

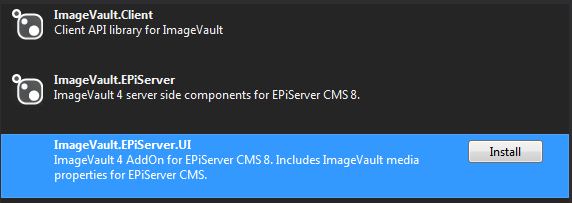
Here you can search for ImageVault and you will see a number of packages.

The two packages that contains the Episerver plugin are ImageVault.EPiServer and ImageVault.EPiServer.UI. ImageVault.EPiServer contains the backend components of the plugin and ImageVault.EPiServer.UI contains the frontend components. (ImageVault.EPiServer.UI has dependencies to all required packages, so it is sufficient to install that package)
Step 2 - Configuring the ImageVault client
To configure the ImageVault plugin for Episerver CMS (or any ImageVault client) you edit the imagevault.client.config file in the webroot folder.
Connection to ImageVault
In the client configuration we enter the details the plugin uses when connecting to ImageVault. This is done using the address attribute on the imageVaultCore node.
<imageVaultCore address="https://imagevaultcore.dev.com/apiv2/" />
Note
to connect to an ImageVault 5 instance, the core address is the url to the ImageVault site with the /apiv2/ suffix. ex. http://myimagevault.azurewebsites.net/apiv2/
To connect to an ImageVault 4 instance, enter the address and port to the Core service. ex. https://myimagevault.domain.com:9901/
Authentication
The authentication consists of an API-key and a secret. For a normal installation the API-key is iv4sdk and the secret is entered when setting up ImageVault.
<authentication>
<sdkIdentity key="iv4sdk" secret="WQEo123&+/dfmkLOsfdkmkje" />
</authentication>
Note
All characters in the configuration values must be xml encoded. So if you use any of the xml specific characters (",',<,>,&) in your secret (or any other value) these must be escaped (",',<,>,&). The example above uses one of these escapes since it contains an & in the secret.
AppSettings
A set of appSettings exist that are used to instruct the plugin and client on how it should work. All appSettings are added using the add node in the appSettings element.
<appSettings>
    <add key="..." value="..." />
</appSettings>
Here follows a description of each appSetting that can be used in this configuration.
| Name | Description |
|---|---|
| defaultMediaUrlBase | This is the URL that is prepended to every media URL. Since the plugin uses a local handler to deliver media from ImageVault, this needs to correlate to that media handler. Default value should be /imagevault to use the default handlers. If no value is defined, then the media URL will point to the ImageVault service. |
| enableClientCache | This enables caching on the client. Not all queries and results are cached, but media queries for URL and metadata are included. Should be enabled on most clients for better performance. Default is disabled. |
| imageVaultUiUrl | If ImageVault UI is not installed locally, use this setting to specify the URL where the ImageVault UI is located. If omitted, a local UI installation is assumed. |
| defaultPublishedMediaUrlBase | If we uses an external media CDN/proxy then we enter the base address here to generate URL:s to that server. Will only affect published media urls. Internal media will still use the defaultMediaUrlBase configuration. |
Example1
This example configuration uses ImageVault 5 in the cloud with a CDN delivering published media.
<?xml version="1.0" encoding="utf-8"?>
<imagevault.client>
<imageVaultCore address="https://myiv.imagevault.app/apiv2/" />
<authentication>
<sdkIdentity key="iv4sdk" secret="DwMi4s&+/d3fsmKje" />
</authentication>
<appSettings>
<add key="enableClientCache" value="True" />
<add key="defaultMediaUrlBase" value="/imagevault/" />
<add key="defaultPublishedMediaUrlBase" value="https://myiv.imagevault.media/" />
<add key="imageVaultUiUrl" value="https://myiv.imagevault.app/" />
</appSettings>
</imagevault.client>
Example2
This example configuration uses an ImageVault UI that is installed on the site (/imagevault).
<?xml version="1.0" encoding="utf-8"?>
<imagevault.client>
<imageVaultCore address="https://imagevault.cloud.com:9901" />
<authentication>
<sdkIdentity key="iv4sdk" secret="DwMi4s&+/d3fsmKje" />
</authentication>
<appSettings>
<add key="enableClientCache" value="True" />
<add key="defaultMediaUrlBase" value="/imagevault/" />
</appSettings>
</imagevault.client>
Example2
This example configuration uses an ImageVault installation on another server.
<?xml version="1.0" encoding="utf-8"?>
<imagevault.client>
<imageVaultCore address="https://imagevault.cloud.com:9901" />
<authentication>
<sdkIdentity key="iv4sdk" secret="DwMi4s&+/d3fsmKje" />
</authentication>
<appSettings>
<add key="enableClientCache" value="True" />
<add key="defaultMediaUrlBase" value="/imagevault/" />
<add key="imageVaultUiUrl" value="http://imagevault.cloud.com/imagevault" />
</appSettings>
</imagevault.client>
Step 3 - Compiling the solution
Now is the time to compile the solution. After compiling, the necessary assemblies are added to the websites bin folder and are ready to go.
Step 4 - Finishing touches
Now you have everything in place to start creating content with media from ImageVault. Head to the PropertyMedia or PropertyMediaList pages to see how to work with the ImageVault properties.